Showing posts with label Arduino. Show all posts

Monday, February 14, 2011

Accelerometer & Compass


No, it's not a B/W TV from the 50's. However Felix the Cat was one of the very first images transmitted to a TV screen.


I wanted to mess around with an accelerometer and this is what I came up with - before getting waylaid making Geiger Counter Kits.

From the beginning, I have to say that this was one of the most frustrating projects I've ever worked on. I consider myself a "completer" but several times, I had the desire to just dump the damn thing in a box, and say to hell with it. I'll try to spare the details of that side of the project.

I had a few goals in mind:
  • to learn about accelerometer and compass modules
  • to make a LiPo battery operated project
  • to use a graphic LCD and a menu system
  • and maybe make something I could put in my car
Lets start with the battery side of the thing. I wanted to be able to charge the LiPo, and I also wanted a constant 3.3V for Vcc and the Aref voltage. For the LiPo charger I used a MAX1555 wired per the datasheet.

Since the voltage on a LiPo can vary on both sides of 3.3V (3.0-3.7V), I decided I needed a "buck-boost regulating charge pump". (It's possible I didn't need one, but the name was so cool . . ..) I discovered the MAX1759 and also wired it per the datasheet. Soldering the tiny uMax package to a piece of proto board was an exercise in tedium.

I didn't want a toggle or slide power switch. I wanted a push button On/Off and I also wanted to Pololu Pushbutton Power Switch - it does all those things. I am working on a homemade version of this switch using an ATtiny85 that I will post here soon.  I added an ATmega328, with all pins broken out, and LCD and FTDI connectors.
automatically power it off from the uC if there was no movement for awhile. And of course, I didn't want to use much power to monitor the switch when the power was off. The solution was the

At last! A shield that actually looks like a shield! This round board fits over this square board. After cutting two notches in it to access the LCD and FTDI connectors it was actually fit for a Gladiator - at least until I added the HMC6352 compass (I2C), MMA7361 accelerometer (analog) and DS1621 temperature sensor (I2C).

Finally, the graphic LCD and joystick. After a few flaky Nokia cell phone faceplates, I got a less flaky version of the Nokia 5110 graphic LCD. For the joystick I used a neat trick I learned from nuelectronics that switches resistors with the joystick so the 5 positions can be sensed by only one analogue input.

A wise man once told me "a project is only as good as it's case". (Actually no one told me that.) Long ago, I made a faceplate out of copper clad PCB board. Why not a whole case? 3D soldering! I also had some vintage phenolic board and some copper foil. I cut the copper clad board and mitered the edges. I soldered the box up from the inside. It solders very well. (I cranked up the iron to 425C.) I used the copper foil to attach and solder the phenolic board on the bottom. In a lot of ways, the case was the most rewarding part of the project. If there's anything worth learning here, this technique might be it.


So that's the hardware side. I'm less proud of the software side. I discovered that coding for the accelerometer and compass quickly make you wish you didn't sleep on your desk during geometry. In addition there's the low pass filtering, running average and . . . the dreaded Kalman filter (actually I didn't use one). I'll post the code at the end here, but if your smart, you won't download it. The menu system is sorta nice though. I got the basis from nuelectronics. I also wrote some simple graphic utilities.

Functionally - well, it needs some work, but he's a rundown of the screens . . .


The main menu . . .
(The accelerometer screen is boring. So is Debug.) The calibrate screen calibrates the compass - 2 revolutions in 20sec.

The compass screen shows degrees and ordinals.
There is also a temperature display.


The performance screen shows acceleration (right of center) and deceleration (left of center.)
The line through the bar sticks at the max recorded.

The roll and pitch screen shows, you know what.


Here's the sketch.


Saturday, October 16, 2010

Receiving X10 RF Transmissions (Updated 11/21/10)

For me, at least, this was the last piece of the open hardware X10 puzzle. In this blog you'll find open hardware projects that receive and transmit PLC (powerline) signals, as well as transmitting X10 RF signals (via the CM17A). Now sitting in front of me, is an off the shelf 315MHz receiver (detuned to 310Mhz), happily beeping away each time a warm body crosses an X10 motion detector.

The receiver is from Sparkfun, but any similar receiver should work. The key is to get one with a tuning slug as opposed to a crystal. The software that interfaces the receiver to the Arduino is from a suite of X10 libraries written by ThomasM. You can find the whole suite (PLC transmit & receive, RF receive, and IR receive) here. Having written an earlier version of PLC receive, I'd recommend his version for PLC receive and transmit as well.

So lets get started. Get a  315MHz receiver, wire it up per the data sheet, get Thomas's libraries and his example sketch, (or get the "test & calibrate" sketch I made here). Press a key on an X10 RF remote. It should work right away, but only at close range.

So the next step is to tune this receiver closer to 310MHz. You'll want to start by adding an antenna. This page gave me the following lengths (in inches) for a vertical wire antenna at 310MHz:

  • 1/4 wave - 9 1/16"
  • 1/2 wave - 18 1/8"
  • full wave - 36 1/4"
I started with 1/4 wave whip antenna, but the ultimate may be the "egg beater" antenna (Google for examples).

Now it's time to tune the receiver to 310Mhz. I don't have a scope, and I found that a sound card scope was of little help, since the signal is clipped to soundcard inputs, so I came up with two alternate methods.

The first method I tried was to simply connect the output (data pin) of the receiver to the Aux-in on my PC. You will hear a lot of noise! (This is due to the AGC built into the receiver.) However you will clearly hear the RF signal when you push a button on an X10 RF remote - as long as it's close and pointing at the antenna. Pointing the remote away from the antenna gave a fainter signal, and moving it further away made it even fainter. So with the faint signal, I simply turned the tuning slug until I got a clearer sound in the speakers when I pushed a button on the remote. Not very scientific, but it seemed to do the job. (I started by turning the slug CCW - this post said ~160° CCW.)

Later I used a different method which seemed to be more "real word". I made the "test & calibrate sketch" linked above. It simply beeps a piezo and outputs to serial whenever the receiver has a good read. Then I clamped a button down on an X10 RF Remote (HR12A) so it would continuously transmit,  and located it at varying distances from the receiver. While listening for the beeps, I adjusted the tuning slug for good reads at the furthest distance.

While using the second method, I also played around with antennas.  The 1/4 wave whip antenna really didn't seem to do much, and I couldn't pick up signals if the transmitter was outside my house. Then I tried a 36 1/4"  piece of twisted pair from a phone cable. One wire to the ANT pin on the receiver and the other to GND. This made a big difference, and the grounded lead contributed to the difference.

That's about where I am at this point. Interfaced to the example sketch I can receive RF signals from the motion sensors on my front and back doors. There's more about this in last half of this thread in the Arduino forum. [4-3-13] (There were changes to X10rf.h - here is the modified version I used.)

Not sure at this point where I want to go with this - perhaps a "whole house" X10 receiver with some other goodies, or some little dedicated device. We'll see.

Sunday, April 4, 2010

Geiger Counter - Part 2 (complete)

[Edit 10/04/24] The kit associated with this project is no longer available.

This post describes how I went about integrating the circuit described in the previous post with an Arduino and a LCD display.

I put it all into an old laptop power supply case - not my best work, but as we said in Arkansas, "it ain't no piano". It does have a nice sturdy feel though.

After experimenting with an LED bar graph and a Nokia 3310 cell phone display, I settled on a simple and cheap 8x2 LCD display from Sure Electronics.

First I moved the Geiger circuit off the breadboard and on to a proto board.
Add caption
I kept things fairly tight which left a little room for future expansion. The piezo is mounted on the bottom of the board. I cut an opening in the bottom of the case under the tube.

On the other side of the case, I added the batteries, display and a small board for the Arduino MCU. It's just a simple stand-alone Arduino circuit using a resonator.
There are also 2 slide switches on the bottom - one to turn off the piezo, and the other to turn off the Arduino and display to save batteries. A salvaged push button on top turns the whole thing on and off.

The code counts the interrupts from the tube for a period of time, and displays the counts / minute as a value on the 1st line and as a bar graph on the second. I adapted the code for the bar graph from DeFex . It's nice because it uses custom characters to make partial blocks.

I used two different counting periods - a longer period when the CPM is below 100 (counting background radiation) and a shorter period when there is more activity. You can download the code here.

Here is the obligatory short movie . . .


It was a nice surprise to find our bathroom tile was hot. (Should help kill the germs!) Since the house was built in the '20s, I imagine it's uranium green glaze.

Sunday, February 28, 2010

Geiger Counter - Part 1

[Edit 10/04/24] The kit associated with this project is no longer available.


I guess I'm a "metroholic".
I've always been fascinated with measurement tools, so building a Geiger counter seemed like a logical thing to do. I will describe the build process here - even though the Arduino only plays small part, and that only a truly sick person (which I guess I am) would consider a Geiger counter as part of a Home Automation project.

"All work is derivative" and I owe the basic HV circuit to Jim Remington's Pololu article (where he mentions he derived the circuit from Tom Napier). To this, I contributed a nice "click" circuit, but more importantly, the sources, tips, and background that is helpful when building your own.

If you don't have a Geiger tube laying around in your junk drawer, you will have to order one. But the important thing is that you can build and test your circuit while you are waiting for that package from Russia.

The Geiger tube I settled on was the SBM-20. I ordered mine on eBay. You can also get it at the Electronic Goldmine (and even a whole kit). Later, I found this source for all tubes Russian, (and the best specs and prices on Geiger tubes). I am very happy with the SSBM-20. I originally tried a smaller glass tube - the CI-3BG - but found it much less sensitive - especially to beta particles.

There are 2 types of tubes. Those that have a mica window are the most sensitive. They will detect alpha and beta particles as well a gamma rays. Because of the mica, they are more fragile and generally are more expensive. The other type, like the SSBM-20 which I used, have only the metal jacket. They will detect gamma rays (the most penetrating) and some beta particles (more easily stopped). Considering the SSBM-20 is all metal, it does a good job with beta - as long as you put the sample right on the tube. Uranium is a big beta emitter, so some sensitivity to beta is a good thing.

As far as the circuit goes, you'll find several types on the internet. (One I also liked is here.) The first circuit I tried used a 1:1 transformer, but I preferred to go with a simple inductor instead. I also liked Jim's circuit because it works with a range supply voltages and uses very little current from the battery. Originally, I wanted the Arduino to be the oscillator instead of the 555, however, later I decided that I preferred the Geiger to run independently, and use the Arduino only for counting and display purposes. For the audio output, I had a good time designing my own based on what I learned on-line.

OK, you've been patient, here's the schematic . . .


On the left is pretty much Jim's circuit without the extra HV shutdown transistor. The 555 is used in an unusual way - it varies the duty cycle based on the input voltage. I tested 4-9V on input. The oscillator (~4KHz) is used with the inductor as a charge pump.

Q2 and D2 are the only critical type components. Q2 must be a high voltage transistor - the MPSA42 is a common type and works nicely. D2 is a "high efficency" or "ultra fast" diode. A regular diode will not work. On the schematic, I have listed some substitutions I've tried that worked. You might find a diode of this type in a PC switching power supply. R7 adjusts the high voltage, and seems to be pretty touchy about it's value - too low or too high and no HV. I bought most of the parts at Electronic Goldmine including the inductor.
[Edit 4/2/11] Also note that I used the CMOS version of the 555 timer - TLC555CP. If you use the bipolor version (uses more current) LM555 or NE555 you will need to adjust some values.

I labeled a HV Test Point. You want about 500VDC through the tube. But here's the rub, it's only a few micro amps, so most DMM's will load the circuit too much to measure it. If you measure around 200VDC you're doing fine. Don't even bother trying to measure across the tube - the 5.7M will drop everything.

Another tip is that the Geiger tube won't work if you leave your DMM connected to the HV test point. In short, you need a very good DMM or faith.

Finally, I wouldn't advise soldering leads directly to the ends of the tube. You run the risk of loosing the vacuum or otherwise damaging the tube. Use some sort of clip, or wrap several turns of wire around the ends.

While waiting for my tube, I tested by touching the wires that would go to it. (Two fingers on the same hand.) It's 500V but just a tiny amount of current. I could not even feel the voltage, but heard the click and got the interrupt. For obvious reasons, I can not recommend this procedure, and I'm just describing what I did. 


You will probably need to tweak the click circuit based on what type of "click" you like, and the resonant frequency of your particular piezo. R14/C7 controls the length of the click and R15/C6 controls the frequency of the click. The phase inverter (IC2B and IC2C) is used to get the most deflection out of the piezo and hence the loudest sound. For the inverters, be sure to use a logic family that provides enough current at the outputs. I had bad luck with the "LS" family and used the "ACT" family (i.e. SN74ACT14N) but the "HC" family should  also work (i.e. 74HC14N).

Once the circuit is built it's fun to play around with. With mine, I get around 35 CPM (Counts / Minute) background - a basement in Colorado, probably with Radon gas. Of course you will likely tear open a smoke detector and get the Am241 pellet out of it (600 CPM) and buy some Uraninite on eBay (350 CPM). [Edit 11/2010: Just tested some lantern mantles (Thorium-238) I got from this guy - got up to 6000 CPM.] The entire circuit consumes less than 3mA @ 5V in normal background.

The interrupt (before D3) goes low for about 150uS for each event. I made a simple Arduino sketch to count the events and calculate CPM. You can download it here. Later, I'll involve the Arduino more - building it into the case, and running a little 8x2 LCD display. Note that the Geiger counter module is totally standalone, so you can stop with that if you want.

For Home Automation, I picture it sitting on my roof with a CM17A periodically transmitting the current background radiation to the Nex10 box in my house (similar to the Wireless Temperature Transmitter). Then, if the radiation exceeds a threshold, I can dim the lights in the living room!


See Part II post above with added MCU board, display, and finished enclosure. But here is an intermediate step with just the Geiger circuit in a case . . .


A quick movie in it's intermediate state . . .

Thursday, September 17, 2009

Is the Garage Door Closed?


After the second time my neighbor had to tell me that I left my garage door open, I thought I'd throw a little technology at my senility.


I could have gone the route of using a PSC01 "PowerFlash" but I had a few problems with that:

  • It requires a "normally closed" reed switch (which opens when the door is closed and next to the magnet. 
  • It only sends the X10 command one time. 
  • It would plug into the same outlet as the door opener - not a good time or place to send X10 signals on the power line. 
  • I wanted to make my own. :-) 
So this ugly little board above was my solution. It consists of an ATmega168 (running on it's internal oscillator), and a CM17A "Firecracker" (removed from it's jacket). It's wire-tied to it's wall wart.

When the normally open reed switch closes - because the door is open - it causes a pin based interrupt in the ATmega168. The CM17A then sends a preset House + Unit + ON wirelessly to a TM751 receiver and it's put on the power line and picked up by the X10 Book (see below). The command is sent 3 times with a delay in between to make sure the signal gets through. When the door closes, an OFF signal is sent 3 times.

(get Arduino sketch)

On the X10 Book side, a timer is started when the first door open signal arrives. After a preset time, the X10 Book beeps every few seconds until it receives a door closed signal.

If the door is open late at night, the X10 Book will also turn on lights near the garage. (I could have it wake me up, but I'd be too tired and too scared to want that!)

Friday, May 22, 2009

X10 Wireless Temperature Transmitter


This is a battery operated Arduino project that uses the CM17A to wirelessly transmit the temperature to the power line. From there, it is picked up by the X10 Book, (see below) and displayed and logged. (It can also be used to trigger macros.)

The PSC05/TW523 will not receive X10 "extended" codes. Therefore I had to get tricky with how I sent the temperature and how I received it. This means that the technique requires you to have control over the receiving end as well.

The idea is simple. An entire House Code is dedicated to the temperature. Each digit is sent as a Unit Code representing that digit (i.e. Unit Code"3" is sent if the digit is 3). The Command is used to indicate the digit position. So for the least significant digit, I used "OFF" for the next digit I used "ON". BRIGHT and DIM can also be used for more positions or to represent + and -. So with 4 types of commands (and 4 separate transmissions) you can transmit variables up to "9999" or "+/-999".

[detail . . .]
Since Unit Codes really have a range of 1-16 you could use this to transmit even larger values - with 2 transmissions you could transmit and digit up to 255. However I choose not to do this because the CM17A is transmitting to the same (TM751) receiver that I use to receive form a motion sensor. The motion sensor uses Unit Codes 1 and 2. So in actuality I offset the digits by 5, leaving the first 5 Unit Codes. (Two for the motion sensor and 3 reserved.) I'm sure there are other methods you can use to transmit values, but this works fine for me.

So much for theory!
Since the CM17A is wireless, it's a nice idea to make the whole thing battery operated. There are techniques to use with the Arduino to conserve battery power. I used one that combines "sleep" mode with the "watchdog timer" There is a good example of this here. The idea is to have the Arduino in low power sleep mode, wake it up every now and then, and have it read and transmit the temperature before going back to sleep. The example cited has a maximum sleep time only 8 seconds, but on waking, a variable can simply be incremented and skip sending until say 10 wakeups have occurred. Mine sends the temperature about every 2 min. (The less often you send, the longer your battery lasts.)

I used the DS1621 temperature sensor. It's I2C and simple to connect. You will find examples of how to use it on the Arduino Forum.
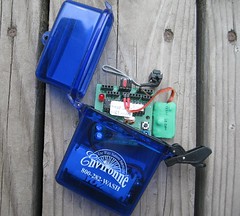
I put everything in a waterproof box. A word about the picture. You can see the DS1621 temperature sensor on the "spring" ribbon cable. The green square on the right is the CM17A with it's jackets removed and covered with heat shrink tubing. The Arduino (ATmemg128) board is a custom board I made that includes a boost circuit so it only needs 2 AA batteries. You can use any Arduino and use 3 AA batteries instead.

On the temperature receiver side (the X10 Book in my case) I look for commands from the dedicated temperature House Code. When I get one, I determine which digit position it represents by the command code, convert the Unit Code into a digit, and store it in a global for that digit position. It's OK if a digit is somehow missed, it's likely to be picked up from the next transmission. When I want to log or display the temperature (periodically or using the TV Remote) I simply multiply the values in the various digit positions to get the current temperature.

Here's a short video . . .

Thursday, May 21, 2009

Sending and Receiving with the PSC05 / TW523


For a long time, the Arduino community had a library (written by Tom Igoe) that would interface the Arduino to the PSC05/TW523 so that it could send X10 commands. (available here) Since I was already wirelessly sending commands via the CM17A, I never took much interest in it.

But then I thought if you could also receive commands with the PSC05/TW523, you could pretty much make your own X10 controller and replace the ActiveHome SW and the CM11A/CM15A hardware.

Again the web provided a lot of the great detail on the protocol that enabled me to write an Arduino driver to receive commands with the PSC05/TW523. I created an example sketch and wrote a lot of background and posted it on the Arduino Playground here. Since the receive driver can coexist with the send library, the Arduino now has a complete interface with the PSC05/TW523 that allows you to send and receive X10 commands.


[3/30/2010] Thanks to Creatrope, a beta of the combined X10 send / receive library is now available - you'll find it here. [1/5/11] Creatrope site down. You can use the separate X10 transmit & receice libs or check out ThomasM's library here

The Playground article should tell you all you need to know about how to use this software, so I won't go into it here. Just to say that the Arduino is always looking for any X10 signal on the powerline at every zero crossing of the AC. When it gets one, it sets a flag, and fills out globals for the House Code, Unit Code, and Command that are used by your program.

With this complete, I was able to make my own X10 controller called the "X10 Book" that I will write about in my next post. 


Edit Nov. 2, 09: Based on a comment by Phil, here's a link to an Ap Note from Microchip that describes how to use a PIC to essentially replace the PSC05. It would be great to port it to ATmega chips. Thanks Phil!


Edit Feb. 23, 09: I've received some very good feedback from Johannes related to changing the send and receive software to have reliable communications using 50Hz line frequency. (He uses an "XM10" X10 module instead of the PSC05 / TW523 for 220V 50Hz.) It's simply a matter of changing 4 #defines - 2 in the X10.lib (for sending) and 2 in my code (for receiving).


In the source for your X10.lib, in X10constants.h change:
#define BIT_DELAY from 1778 to 2133
#define BIT_LENGTH from 800 to 900


In my example for the X10 Receive function, in PSC05.h change:
#define OFFSET_DELAY from 500 to 800
#define HALF_CYCLE_DELAY from 8334 to 10000


Thanks Johannes! I'm sure others will find this helpful.

Wednesday, May 20, 2009

The CM17A and Arduino

My first X10 project was to create an interface between the Arduino and the CM17A (aka "Firecracker"). The CM17A is a dongle that wirelessly (RF) sends X10 commands to X10 RF receivers. The receivers then send signals down the house wiring to control lights and appliances.

After many hours of Googling, I could not find any examples of an interface other than some written in assembler. However, I did find lots of good information about the protocol that is used to talk to the CM17A. With that I was able to write a small program ("sketch") that demonstrates how to have the Arduino talk to the CM17A. I wrote up an article with the explanation and example and posted it on the Arduino Playground here. It should tell you all you need to know.
I made a short video of a simple example where a TV remote is used to have the CM17A send X10 commands to a light.


Don't let the custom boards and led matrix scare you. There are much simpler ways to use the CM17A with Arduino. In a future post I will describe how it can be used to send the temperature to a home made X10 Controller.

What is Arduino? / What is X10?

It's likely that most people reading this will know a lot about either Arduino or X10. (If you know about both - you're in good shape. If you don't know about either - I'm surprised you're here!) In any case, I won't go into detail about either. You can learn about Arduino here, and Google will give you lots of info on X10.

In short, the Arduino is an inexpensive (~$30) microcomputer that you program in C/C++ that has input and output pins that connect to real world devices. I choose the Arduino because of it's popularity, price and wonderful support.  It's likely another type of microcomputer can be used for these projects, but I'm only comfortable discussing the Arduino and the C language.

X10 is a home automation system that typically sends signals down your power line to remotely control lights and appliances. There are many types of modules one can get to do various things. While X10 is old technology, it still has some key advantages regarding remote control. Primarily, it is the cheapest and safest way I know of to control things that plug into the power line. 

So what are the advantages when you combine the Arduino and X10? Here is a diagram where I tried to show X10 and Arduino working together.


From an X10 user's perspective, the X10 world now becomes your oyster. You are no longer bound by a PC and the limited functionality and cost of commercial software. You can create entirely new functionality while replacing your ActiveHome SW and your CM11A / CM15A interface device.

From an Arduino user's perspective, you gain an option for wireless remote control at a much lower cost per controlled device than say XBee and roll your own triacs. It's also a hell of a lot safer than mucking around with line voltage. The modules are UL approved and cost as little as $6 on Ebay  (link just an example).

Obviously, all of the above is just my opinion and points can be argued. You can fault X10 for not being reliable. Personally I solved most of my issues with a XPCR coupler /filter / amplifier. For those in 220V land, X10 charges an arm and a leg extra for the 200V models. See this website for a cheap way to convert most 115V modules.

OK, enough background.